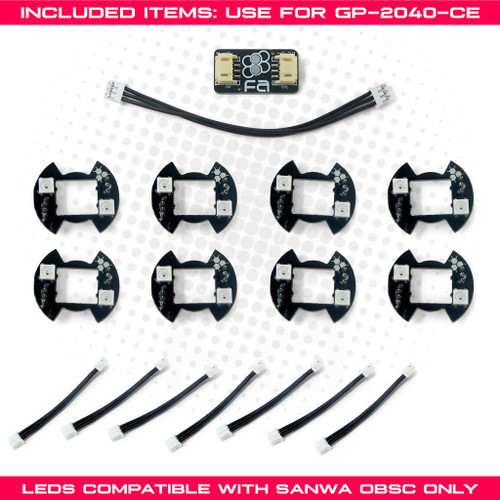
Description Reviews The GP2040-CE (Community Edition) is a controller input firmware for the Raspberry Pi Pico and other boards that derive from RP2040 microcontrollers. Among a robust list of features, the GP2040-CE also has its own per-button LED support. You can view pre-set static button colors, pre-programmed animations, and console specific button colors! Learn more about GP2040-CE's LED capabilities here: https://gp2040-ce.info/rgb-leds/ Sanwa OBSC compatible, 30mm These addressable RGB LEDs were first developed in 2017 by SRK Forum member 32Teeth, and manufactured before many more button models were introduced to the fighting game community. Thanks to TheTrain, these PCBs are now usable with the popular open source controller PCB. As such, the PCB design is compatible only with Sanwa OBSC 30mm or similar buttons with Sanwa OBSF/OBSC housing and Sanwa SW-68 Button Micro Switch base. We cannot guarantee compatibility with any other pushbutton design, nor 24mm OBSC. Use with one (1) FA RGB LED Converter Board for GP2040-CE The FA RGB LED Converter Board for GP2040-CE converts the GND > D+ > VCC pinout of the FA button LEDs to the GP2040-CE pinout D+ > GND > VCC.Should you use the FA 30mm Button RGB LED for GP2040-CE, it's highly recommended that you also purchase the converter board. The pinout order of our LEDs may not match other devices natively. Your adapter will come with a wire already connected to the `In` side, simply connect that to your RP2040 Advanced Breakout board's RGB LEDs" port and the `Out` side to the LED modules. From there, you can connect a FA 3-Pin RGB LED Connector Harness (6 Inch) or FA 3-Pin RGB LED Connector Harness (12 Inch) to the RGB LED. This product hasn't received any reviews yet. Be the first to review this product! WRITE A REVIEW Write a Review Close × TheTrain FA 30mm Button RGB LED for GP2040-CE Rating Required Select Rating 1 star (worst) 2 stars 3 stars (average) 4 stars 5 stars (best) Name Required Email Required Review Subject Required Comments Required
Hızlı Montaj Kılavuzu
Mounting: Snap-in buttons push into a 30mm hole from the top of the panel. Screw-in buttons thread from below and secure with a nut. Use 2-3mm acrylic, wood, or metal panel.
Wiring: Connect the microswitch terminals to your encoder or PCB. Common ground shared across all buttons. Quick-disconnect (0.110") terminals are standard on Japanese buttons.
Boyutlar
Sorun Giderme
Not responding to input
Check wiring continuity with a multimeter. Verify the contact block is properly seated. Inspect terminals for loose connections.