BNB-V3-CASE-PANEL-ABPLUS4-MK
ActiveBNB Fightstick Gen 2 and 3 Black Matte Plexi Replacement Panel - AllButton Plus 4 Layout

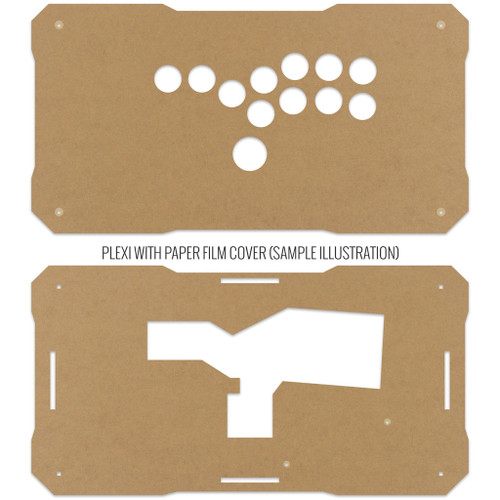
Description Reviews Videos Layouts AllButton Plus Four and Mixup require use of GP2040-CE PCB and its built-in webconfig app to remap controls to extra buttons and option buttons. Currently Brook brand PCBs cannot do this. Please view videos by Jonyfraze to learn how to remap input controls in GP2040-CE via its webconfig app. You will find these in the video tab or scroll to "Videos". BNB Gen 2 and Gen 3 panels are not compatible with Gen 1. The top and supporting panels of Gen 2 and 3 have a smooth corner, which differs from the sharper corners of the previous generation. Additionally the supporting panel and side panels contains a second tab, which is incompatible with Gen 1. We will continue to support replacement panels, sides, and artwork services for BNB Fightstick Gen 1 models. Gen 2 panels will now ship with a slimmer 3mm top panel for snaputton compatibility. Gen 3 top and support panels are compatible with Gen 2, and vice versa. The top two panels of the BNB Black Matte Plexi Fightstick consist of the control panel and supporting panel. The control panel provides installation for pushbuttons. The supporting panel contains the joystick mount (as applicable to the layout) and mount for PCB. It also contains an open space for the pushbuttons, shaped to the button configuration. Both are .177" (4.49mm) thick, and possess contour screw holes for use with Set of 8 Bolts for BNB Fightsticks - Black and Set of 2 Bolts and Nuts for BNB Fightsticks PCB Mount. Slimmer Top or Bottom Panel. Backwards Compatible with BNB Generation 2 The BNB Generation 3 top and bottom panel uses a slimmer 3mm acrylic surface, allowing for easier install of popular snapbuttons. The sub panels that rest between them are a thicker .177" (4.9mm), offering sturdy support. Both top and sub panels are backwards compatible, installing on earlier Gen 2 models without issue. Matte Texture on One Side The Black Matte BnB is designed for those who love its sleek presentation. It's important to note that the acrylic material that we cut offers a matte texture on one side, and gloss texture on the opposite side.Currently, we are offering the matte texture facing outward, as customers for BNB Gen 2 complained of fingerprints from the gloss side when it faced outward. Black Matte is slghtly brighter so it will not directly match all solid black accessories, which tend to have a glossy texture.Please refer to the photos below for comparison between gloss and matte texture. Gloss Texture Matte Texture Please note that the opposite side of this plexi will have a black gloss. Pre-Wrapped in Paper or Film Backing The panels are cut from acrylic sheets with protective brown paper or blue plastic film. You may see scratches or wear on the paper or film as the sheets are cut and transported from the acrylic manufacturer to us, and should not appear on the plexiglass once removed. To remove the film, use a fingernail on any available corner and proceed to pull away at the backing. The paper or film does not have adhesive and should not leave residue on the plexiglass. BNB Assembled Dimensions Here are the Width x Length x Height dimensions of an assembled BNB Fightstick: Side Panel Height Width Length Height 1.5" 15" 7.875" 2.25" 1.75" - - 2.50" 2.0" - - 2.75" This product hasn't received any reviews yet. Be the first to review this product! WRITE A REVIEW Write a Review Close × BNB Fightsticks BNB Fightstick Gen 2 and 3 Black Matte Plexi Replacement Panel - AllButton Plus 4 Layout Rating Required Select Rating 1 star (worst) 2 stars 3 stars (average) 4 stars 5 stars (best) Name Required Email Required Review Subject Required Comments Required Videos Hide Videos Show Videos BnB Fightstick Gen 3 Assembly Tutorial 00:15 Overview 01:45 Build Prep 02:20 Side Panels 05:30 Top Pa... Map D-Pad & Analog Directions on your Fightstick with GP2040-CE - Dual Directional Input Tutorial Map D-Pad & Analog Directions on your Fightstick with GP2040-C... GP2040-CE Function Button Adds Multiple Inputs into ONE Button! Info on GP2040-CE: https://gp2040-ce.info/#/ Info on 4TW Figh...
Installation Quick Reference
Mounting: Snap-in buttons push into a 30mm hole from the top of the panel. Screw-in buttons thread from below and secure with a nut. Use 2-3mm acrylic, wood, or metal panel.
Wiring: Connect the microswitch terminals to your encoder or PCB. Common ground shared across all buttons. Quick-disconnect (0.110") terminals are standard on Japanese buttons.
Dimensions
Troubleshooting
Not responding to input
Check wiring continuity with a multimeter. Verify the contact block is properly seated. Inspect terminals for loose connections.
Quick Specs
Learn More
More from BNB Fightsticks

BNB Fightsticks
BNB-CASE-PANEL-ALL24
BNB Fightstick Gen 1 Clear Plexi Replacement Panel - All 24mm Button
BNB Fightsticks
BNB-CASE-PANEL-ALLBUTTON
BNB Fightstick Gen 1 Clear Plexi Replacement Panel - All Button Layout

BNB Fightsticks
BNB-V3-CASE-PANEL-6GAWD-AB-MK
BNB Fightstick Gen 2 and 3 Black Matte Plexi Replacement Panel - 6GAWD AllButton Layout